
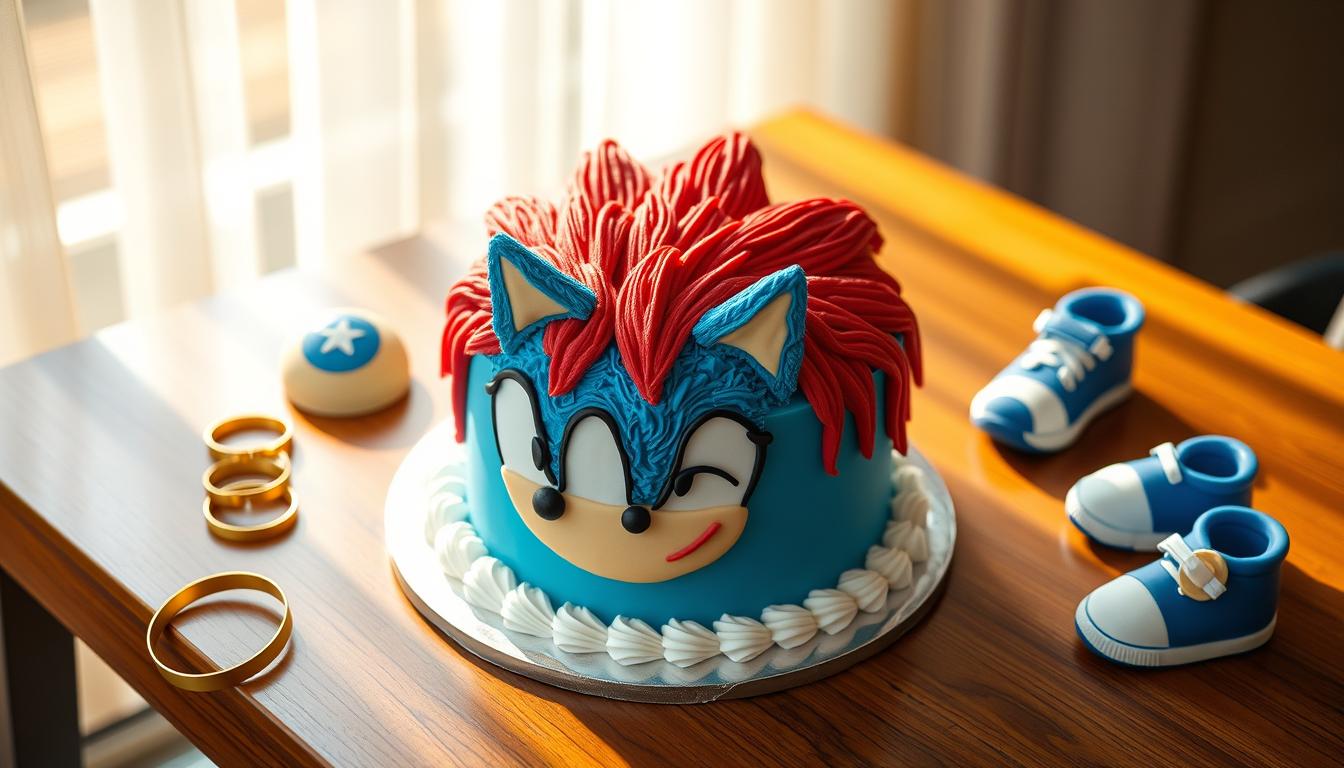
A Sonic cake is more than just dessert. It’s a celebration of speed, style, and fun. It features designs inspired by Sonic the Hedgehog, perfect for birthdays, gaming parties, or themed gatherings. Its bold colors and playful details make your event unforgettable.
Imagine serving a cake that looks like Sonic’s head, with blue frosting and red sneakers. This guide will help you turn your baking into a masterpiece that captures Sonic’s adventurous spirit. Each step is simple and creative, ensuring your cake tastes as good as it looks.

Table of Contents
Introduction to Baking a Sonic Cake
Make any celebration special with a Sonic-themed birthday cake. It’s more than just dessert; it’s a showstopper. It brings joy with its bright colors and fun designs.
Picture a blue cake that looks like Sonic’s spikes, with red for his shoes. Every bit, from frosting to fondant, makes it unique. It’s not just baked; it’s made to capture Sonic’s spirit.
Starting this project is an exciting journey. You’ll mix flavors, shape layers, and decorate with icing. It’s a hands-on adventure that builds skills and creates a memorable cake. Every step, from mixing to decorating, makes your birthday cake a hit at parties.
Next, we’ll cover what you need to get started. You’ll learn about ingredients, tools, and techniques. You’ll see how to bring Sonic’s world into your kitchen. Are you ready to make baking an unforgettable experience for your guests?
Essential Ingredients and Tools for Your Sonic Cake
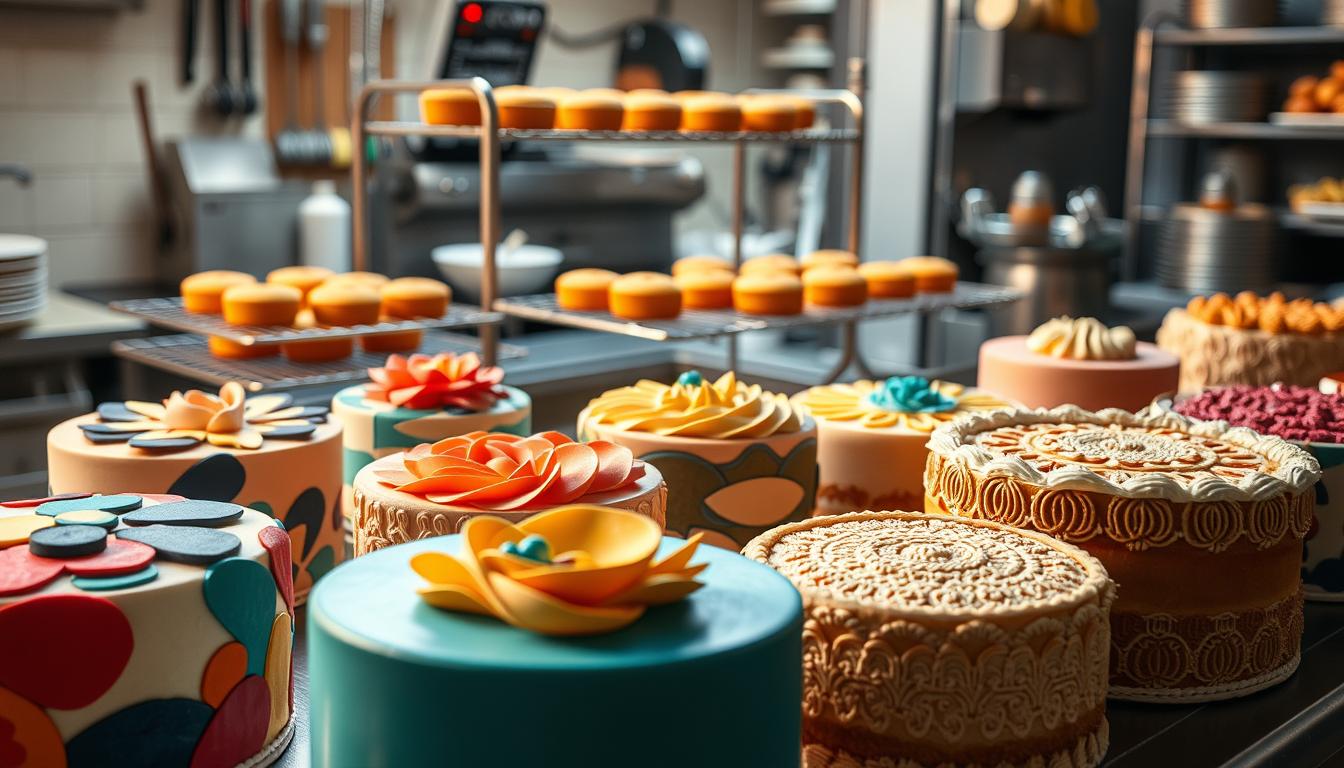
Making a sonic the hedgehog cake needs the right ingredients and tools. Start by making a detailed shopping list. Then, get the best equipment to make sure your specialty cakes are perfect.
Shopping List Essentials
First, get top-notch cake mixes or make your own batter. Use bright red and blue food coloring, like Americolor gel dyes, to get Sonic’s colors right. Fondant in bright colors will cover the cake smoothly.
Buttercream is key for filling and decorating. Add edible glitter or luster dust for shine. Use modeling chocolate for Sonic’s spikes and other 3D details.
Tools Every Baker Needs
You’ll need a 9-inch round cake pan, an offset spatula, and piping bags with different tips. A serrated knife is for clean layers, and a turntable makes decorating easier. Use a fondant smoother and modeling tools for details.
Invest in strong cake boards to hold the cake up.
Good ingredients and tools make your sonic the hedgehog cake stand out. Choose brands like Wilton or Ateco for lasting quality. With this list, you’re all set to make a stunning specialty cakes masterpiece.
Setting Up Your Baking Station for Party Success
Creating custom cakes needs a tidy workspace. Begin by clearing a clean counter. Then, gather all tools and arrange them neatly to avoid last-minute messes. A messy area can lead to mistakes, so keep things organized from the start.
- Clear a central workspace with ample surface area.
- Group similar tools (mixing bowls, piping tips, rolling pins) in accessible zones.
- Keep a trash bin nearby to discard packaging and scraps instantly.
| Organized Setup | Disorganized Setup |
|---|---|
| Dedicated areas for mixing, decorating, and tool storage (ideal for custom cakes) | Scattered tools leading to delays and errors |
| Easy access to ingredients and equipment | Time wasted searching for essentials |
« A clean workspace is a happy workspace, » say professional bakers. Their advice: « Avoid multitasking with dishes or phone calls while handling delicate cake layers. »
Consider a rolling cart for easy storage or a magnetic strip for knives and spatulas. A well-organized station reduces stress and boosts creativity. This ensures your custom cakes are perfect every time.
Step-by-Step Sonic Cake Preparation
Mastering the basics is key to success. Follow these steps for a cake that tastes as thrilling as Sonic’s adventures.
Prepping Your Ingredients
Begin by measuring ingredients precisely. Sift flour and cocoa powder to remove lumps. Separate wet and dry mixes to prevent clumping.
Chill butter and eggs at room temperature. This ensures even incorporation.
Mixing Techniques
- Cream softened butter and sugar until fluffy, about 2-3 minutes.
- Add vanilla extract and eggs one at a time, mixing slowly to avoid splashing.
- Fold dry ingredients into wet mix in three parts using a spatula—gentle folding prevents overmixing.
Baking Temperature Guidelines
Preheat your oven to 350°F (175°C). Use an oven thermometer for accuracy. Bake for 25-30 minutes until a toothpick comes out clean.
A well-baked cake holds its shape, perfect for cake delivery or centerpiece display.
Timing is crucial—overbaking dries the cake, while underbaking risks instability during decorating. Let the layers cool completely before assembling to avoid cracking. Once ready, your Sonic masterpiece is primed for frosting and customization.
Creating the Perfect Sonic Cake Batter and Layers
Begin by picking ingredients that boost cake flavors and match Sonic’s bright colors. Choose from chocolate, vanilla, and strawberry to create bold layers. Use Ghirardelli cocoa or McCormick extracts for a rich taste and striking visuals.
Choosing the Right Ingredients
Try these flavor mixes to match Sonic’s colors:
| Cake Flavors | Key Ingredients | Layer Purpose |
|---|---|---|
| Dark Chocolate | Cocoa powder, espresso | Deep blue base layer |
| Vanilla Bean | Pure vanilla extract, butter | Smooth middle layer |
| Strawberry Swirl | Fresh strawberries, food dye | Accent layers in pink/red |
Layering Techniques
Here’s how to layer:
- Pour light cake flavors first to form base shapes.
- Alternate darker batters in separate pans for stacking.
- Add gel food coloring to create gradient hues between layers.
Achieving the Ideal Texture
Keep your cake moist with these tips:
- Use buttermilk in vanilla layers for tenderness
- Beat egg whites separately for fluffy chocolate layers
- Add apple sauce to red layers for natural moisture
Check if layers are done by inserting a toothpick. They should spring back when touched.
Baking Techniques and Timing Tips
Creating perfect cake designs begins with accurate baking. Preheat your oven 15–20 minutes before mixing. Place racks in the center for even heat. Make sure butter and eggs are at room temperature for better results.
- Use an oven thermometer to confirm temperature accuracy.
- Rotate pans halfway through baking for uniform browning.
- Check doneness with a toothpick—insert it into the center; it should come out clean.
Timing can vary based on your oven. Convection ovens bake faster, so reduce the temperature by 25°F and check 10 minutes early. Traditional ovens should follow the recipe times but watch the edges closely. Overbaking can dry out the cake, ruining its texture and cake designs.
“Consistency comes from patience. Let cakes cool fully before decorating—this prevents frosting from melting.”
Adjust baking time for different pan sizes. Smaller pans might need 5–10 extra minutes. Test layers by lightly pressing the top—if it springs back, it’s done. Cooling racks help prevent sogginess, ensuring sturdy layers for perfect cake designs.
Decorating Your Sonic Cake Masterpiece
Turn your Sonic cake into a masterpiece with creative cake decoration techniques. Use buttercream or fondant to add details like Sonic’s blue fur or green shoes. Begin by frosting the layers smoothly to create a clean base for your designs.
“A well-decorated cake tells a story—let every element reflect Sonic’s speed and charm.”
Icing Styles and Techniques
- Use a piping bag with a star tip to create fur-like swirls on Sonic’s body.
- Roll fondant into thin sheets to mold facial features or power rings.
- Add glossy highlights with food gel for a dynamic look.
Edible Decorations Ideas
Bring the theme to life with:
- Edible metallic dust for metallic rings or shoes.
- Candy eyes and gel pens to draw expressive details.
- Custom printed fondant for Green Hill Zone backgrounds.
Try gradients or gradient colors to match Sonic’s iconic look. Each cake decoration should add to Sonic’s lively energy. Let your creativity shine while keeping the design bold and balanced.
Customizing Flavors for a Unique Sonic Cake
Make your themed cakes stand out by trying new flavors. Sonic’s fun vibe matches bold and bright tastes. Pick a base like chocolate or vanilla, then add unique twists.
Think about using fruits like strawberries or blueberries for Sonic’s colors. Or, go for something bold like mocha or lemon zest for a tangy taste.
- Classic Options: Vanilla bean sponge with buttercream.
- Modern Twists: Matcha green tea layers with raspberry filling.
- Sweet & Savory: Salted caramel drizzle over chocolate fudge.
“The best themed cakes balance flavor and theme—let taste match the visual story.”
Match your flavors with fillings like cream cheese or espresso ganache for more taste. Add fun touches like crushed gummy bears or sprinkles in the batter. Always test a small batch first to make sure it tastes right.
Whether you choose a rich chocolate or a zesty lemon, your Sonic cake will be a hit.
Crafting the Sonic Themed Decorations
Make your cake a tribute to Sonic with decorations that stand out. Use blue and green gradients to match his colors. Add red accents for his shoes. Each detail should scream “Sonic” without cluttering the design.
Incorporate Sonic the Hedgehog Elements
- Paint Sonic’s face on top using food-safe markers or edible glitter for his eyes.
- Create quill shapes with blue frosting or fondant, arranged in a spiral pattern.
- Add motion lines with white piping to give the cake a sense of speed.
Creative Frosting and Fondant Ideas
For 3D elements, mold fondant into Sonic’s head or shoes. Use toothpicks to attach them securely. Try these tips:
- Layer green and blue frosting to create depth.
- Use a star tip to pipe red stripes on his shoes.
- Add tiny blueberry “speed trails” around the cake base.
Pro tip: Reinforce fondant figures with a marshmallow or dowel inside to keep them sturdy.
Assembling and Finalizing Your Sonic Cake
It’s time to put your Sonic cake together. Follow these steps to make sure it looks as good as it tastes.
Layer Assembly Tips
Begin by placing the bottom layer on a strong base. Use dowel rods or cake supports between tiers to keep them from sinking. Use a turntable to align layers evenly and decorate smoothly.
Finishing Touches
Add the final details like fondant spikes for Sonic’s quills or edible glitter for his shoes. Make sure everything is securely attached. Finally, dust with powdered sugar to look like motion trails.
Pro tip: Test the cake’s stability by gently moving it. If it wobbles, adjust the supports. Display it on a colorful plate or stand to match the theme.
Tips for a Successful Birthday Cake Celebration
Getting your Sonic cake ready for the big day is key. Bakers stress these important steps to avoid any last-minute problems:
- Storage: Store the cake in a cool, shaded spot 2 hours before serving. This keeps the frosting from melting due to sunlight.
- Timing: Show off the cake when everyone is together, like after games or speeches. This builds excitement and anticipation.
- Backup plan: Have an extra slice wrapped in parchment paper in the fridge. You never know when you might need it.
- Decor coordination: Use themed tableware to match the cake. Red and blue decorations are perfect for Sonic’s colors.
« A cake’s magic fades without proper attention to the moment it’s unveiled. » – Martha Stewart’s Baking Handbook
Check if the cake is stable 30 minutes before. Make sure decorations are stuck well. Use small forks to avoid crumbs messing up the design. Also, tell guests about any food allergies and label ingredients clearly. Take photos before cutting the cake to share on social media. With these tips, your Sonic cake will impress everyone from the start to the last bite.
Serving Suggestions and Party Presentations
Showing off your Sonic Cake is the last step to wow your guests. It’s all about style and taste to make each bite unforgettable. Here are some tips to make your cake the highlight of the party.
Plating the Cake
Put your cake on a strong stand or a blue-and-gold plate to match Sonic’s colors. Sprinkle edible glitter or sugar gems around the base for a lively look. For a big reveal, cover it with a clear dome until the party’s peak moment.
Complementary Party Foods
- Serve mini chili cheese fries (inspired by Sonic Drive-In’s menu) as a fun appetizer.
- Offer rainbow fruit skewers dipped in yogurt for a colorful, healthy option.
- Pair with Slurpee-inspired slushies in blue and red flavors for a themed drink.
- Set out bite-sized cookies shaped like rings or hedgehogs for dessert variety.
Decorate tables with green and gold streamers to match Sonic’s theme. Use disposable plates from brands like Dixie for easy cleanup and a festive vibe.
Incorporating Specialty and Custom Cakes Ideas
Make your Sonic cake stand out by adding your personal touch. Specialty cakes should show off your unique style while keeping up with the latest trends.
Personalizing Cake Designs
- Add textured elements like fondant spikes for a dynamic finish.
- Incorporate themed colors—mix Sonic’s signature blue with metallic accents.
- Use edible images of Sonic’s iconic shoes or green hills from his games.
Inspiration from Top Bakery Trends
| Trend | Description | Sonic Application |
|---|---|---|
| 3D Sculpting | Layered sugar-paste sculptures | Build a mini Green Hill Zone backdrop. |
| Metallic Accents | Gilded or silver finishes | Outline Sonic’s outline with gold leaf. |
| Edible Art | Painted fondant scenes | Depict Sonic in motion using blue and red gradients. |
“The best custom cakes balance personal meaning with what’s trending in bakeries today.” – BakePro Magazine
Try out these ideas to make a Sonic cake that’s both classic and modern. Let your imagination lead every step, from mixing the batter to decorating the top.
Utilizing Cake Delivery and Flavors Variety
When you deliver your Sonic cake, make sure it stays fresh and safe. Use insulated containers and keep it away from extreme temperatures. If you’re using a cake delivery service, look for companies like DoorDash or Uber Eats that focus on baked goods.
Match your delivery plans with a variety of flavors to please everyone. Offer choices like chocolate fudge, strawberry cream, or mint chocolate chip. Here’s how to balance choices:
- Survey guests’ preferences before baking.
- Test small batches of new flavors first.
- Label each slice with flavor names for clarity.
Professional bakers recommend trying out these flavors:
| Flavor | Description | Pairing Tip |
|---|---|---|
| Vanilla Swirl | Creamy vanilla base with swirl patterns | Pair with raspberry sauce. |
| Matcha Green Tea | Earl Grey tea-infused batter | Accompany with white chocolate shavings. |
“Flavor diversity ensures no guest feels left out,” says the team at Sweet Creations Bakery.
Combine delivery plans with flavor choices for a memorable Sonic-themed dessert experience. Always confirm delivery timelines to keep cakes fresh until the celebration starts.
Conclusion
Your Sonic cake journey is all about mixing baking skills with creativity. You’ve learned to mix batter, layer textures, and add Sonic details. Using fondant for spines or icing for trails makes your cake pop.
Even beginners can make amazing cakes, as shown by many success stories. Try different flavors like chocolate or vanilla. Then, add edible decorations that bring Sonic’s world to life. Tools like offset spatulas and piping bags make your cake stand out.
Showing off your cake at parties is always a hit. Guests love both the taste and the creativity. Share your cake on social media and keep these tips handy for future celebrations. Your Sonic cake is more than dessert; it’s a celebration of your passion and skill.